Sunday, December 8, 2013

Brewing water kefir

Every sewing, chicken-keeping, veggie-growing blogger these days seems to be fermenting something-or-other for all its probiotic goodness. Hello, bandwagon. May I jump on?

I was given some water kefir 'grains' by my sister-in-law, and spent a bit of time Googling up how to deal with them. Kefir grains are a kind of 'SCOBY' (symbiotic culture of bacteria and yeast - how I love an opportunity to use the word symbiotic). Apparently the kefir liquid created with these grains is chock-full of beneficial organisms for the digestive system. There's also a different sort of kefir that is done with milk, which I guess is more of a yoghurt type of thing.

I'm so pleased with how it's been going. How's this for a recommendation, it's:

  • cheap
  • very, very easy
  • no waste
  • delicious!

Does it get any better than that?

Here's how I have been brewing kefir.

INGREDIENTS:

A ratio of:

1 tablespoon fresh kefir grains (mine came in some sugar-water so I just drained them)
1 tablespoon soft brown sugar
1 cup water, if using tapwater, leave to sit for at least 12 hours to allow chlorine to evaporate
2 - 3 thin slices fresh ginger

I started with about 3 tablespoons of kefir grains and the resulting (roughly) 3 cups of kefir is a great amount to share amongst the five of us in the family.

EQUIPMENT:

1 large glass preserving jar
piece of mesh/tulle to cover top of jar, and a rubber band to hold it on
1 large glass jar or bottle with hinged, airtight lid

METHOD:

In a saucepan, heat a small amount of the water together with all the sugar and stir until the sugar is dissolved. Add the rest of the water to cool it down. When it's no warmer than blood temperature, pour this sugar-water over your fresh kefir grains. Add ginger slices. Cover the jar top with the mesh  (I used a piece of tulle left over from these alien masks!) and allow to ferment at room temperature about 48 hours. That's the kefir grains at the bottom of the jar in the photo below.


Remove ginger slices and drain kefir into the sealable jar. Repeat the sugar-water process with the grains to start brewing your next batch.

Close the lid of the sealable jar and let it sit around 12 hours at room temperature for a second fermentation (a slight fizz will develop). Refrigerate and drink!

With the added ginger the flavour really reminds me of the ginger beer my brother used to brew at home using a ginger beer 'plant' that somehow involved sultanas and, I guess, wild yeast. Yum! The boys all love it and we have a fresh batch available every second day. I have actually noticed a slight similarity in flavour to the yeastiness of Coopers Pale Ale... perhaps that means that a Pale contains beneficial tummy-stuff?? (One can only hope.)

Initially I was using raw sugar but I think the fermentation has been better since I switched to soft brown sugar. The colour looks slightly less appetising though, ha. But check out the fermenty-froth!

From what I have read, the grains like the minerals in richer sugars. Gradually, the grains should multiply. After about a month I have been able to divide my batch in two and share grains with a friend.

Are we feeling healthier? Eh, who knows. I don't want to jinx us by supposing that we've avoided any ills by drinking this. But it's yummy, and fun. And if it's helping our guts, well, that's a bonus.

- Jane x

Tuesday, December 3, 2013

So easy, it feels like cheating

I finally got my mitts on a copy of the book 'You Sew Girl' by Nicole Mallalieu. For some time now I've been wanting to try her 'Pattern-free Cowl Top' that's in the book. I shopped my stash and the fabric I came up with was actually long enough to try a dress: exactly the same technique, just longer, as the book suggests. (It's a light cotton knit with a touch of spandex, I think originally purchased from Crafty Mamas.)


I'm ridiculously pleased with the result. For one thing, I never thought a dress in this style would suit me (lumps and bumps, hello). For another, it was so insanely quick and easy to put together. It just seems almost wrong for a dress - or even a top - to come together this fast! Nonetheless, it's the clever techniques in the book that make it work.
Sure, it's not a perfectly-fitted sheath but that's what I like about it. The cowl neck kind of gives it permission to be a bit drapey and moveable all the way down. It's about as comfy as a giant slipper. And if you want it more fitted, the book can guide you.

I think the book would be worth purchasing just for this garment alone. But there are plenty of other things in there that would be worth a try too, and as usual Nicole Mallalieu's instructions are clear and precise. (No, no-one's paying me to say this... although the book is available in our shop :D   Oh actually... better check on stock and order if need be! This shop-running thing is still all new.)

If we hadn't just begun summer here, I'd be immediately planning one of these in merino wool knit. To be honest I probably have enough summer dresses so can't really justify another of these but I probably do need a top or two....

- Jane x


Sunday, December 1, 2013

Anna Maria Horner + Melody Miller

Anna Maria Horner's beautiful Painted Portrait Dress pattern meets Melody Miller's gorgeous arrows cotton/linen blend (by Kokka)... a match made in heaven! (Well, South Australia. But it's pretty nice here.)

This is my second version of this dress, which I made before in linen, here.

I actually made it a while ago but it spends a bit of time hanging in the shop as a sample (I want everyone to know how awesome this pattern is!) so it's taken a while to blog it.

Things I love about this pattern:

1. It's loose and easy to wear, but has lovely shaping so it's not just a big ol' sack. The side panels and yoke effectively give it princess seams.
2. Massive great capacious pockets.
3. Incorporation of one button - chance to find that perfect button from the stash!
4. Totally wearable on its own or layered with things under and/or over it.

I had some fun figuring out the pattern placement with this beautiful border print fabric. I'm really pleased with how it turned out. I ummed and ahhed about using the scalloped border and flower again on the yoke, and cut it out to try, but in the end just went with arrows. The yoke is fully self-lined so the flowers and scallops ended up inside! It's quite a fabric-efficient garment. I can't remember exactly how much I used but it was definitely less than 2 metres (1.7 maybe?).


If I made this pattern again, and there's a high likelihood of that, I would probably try to figure out a minor FBA. It's a size M and in the linen, which had a bit of 'give', there's a bit more breathing space than this version. Shouldn't be too hard to add a teeny bit of width at the side panel where it meets the bottom of the yoke, should it? (Tips welcome!)

- Jane x

Friday, November 29, 2013

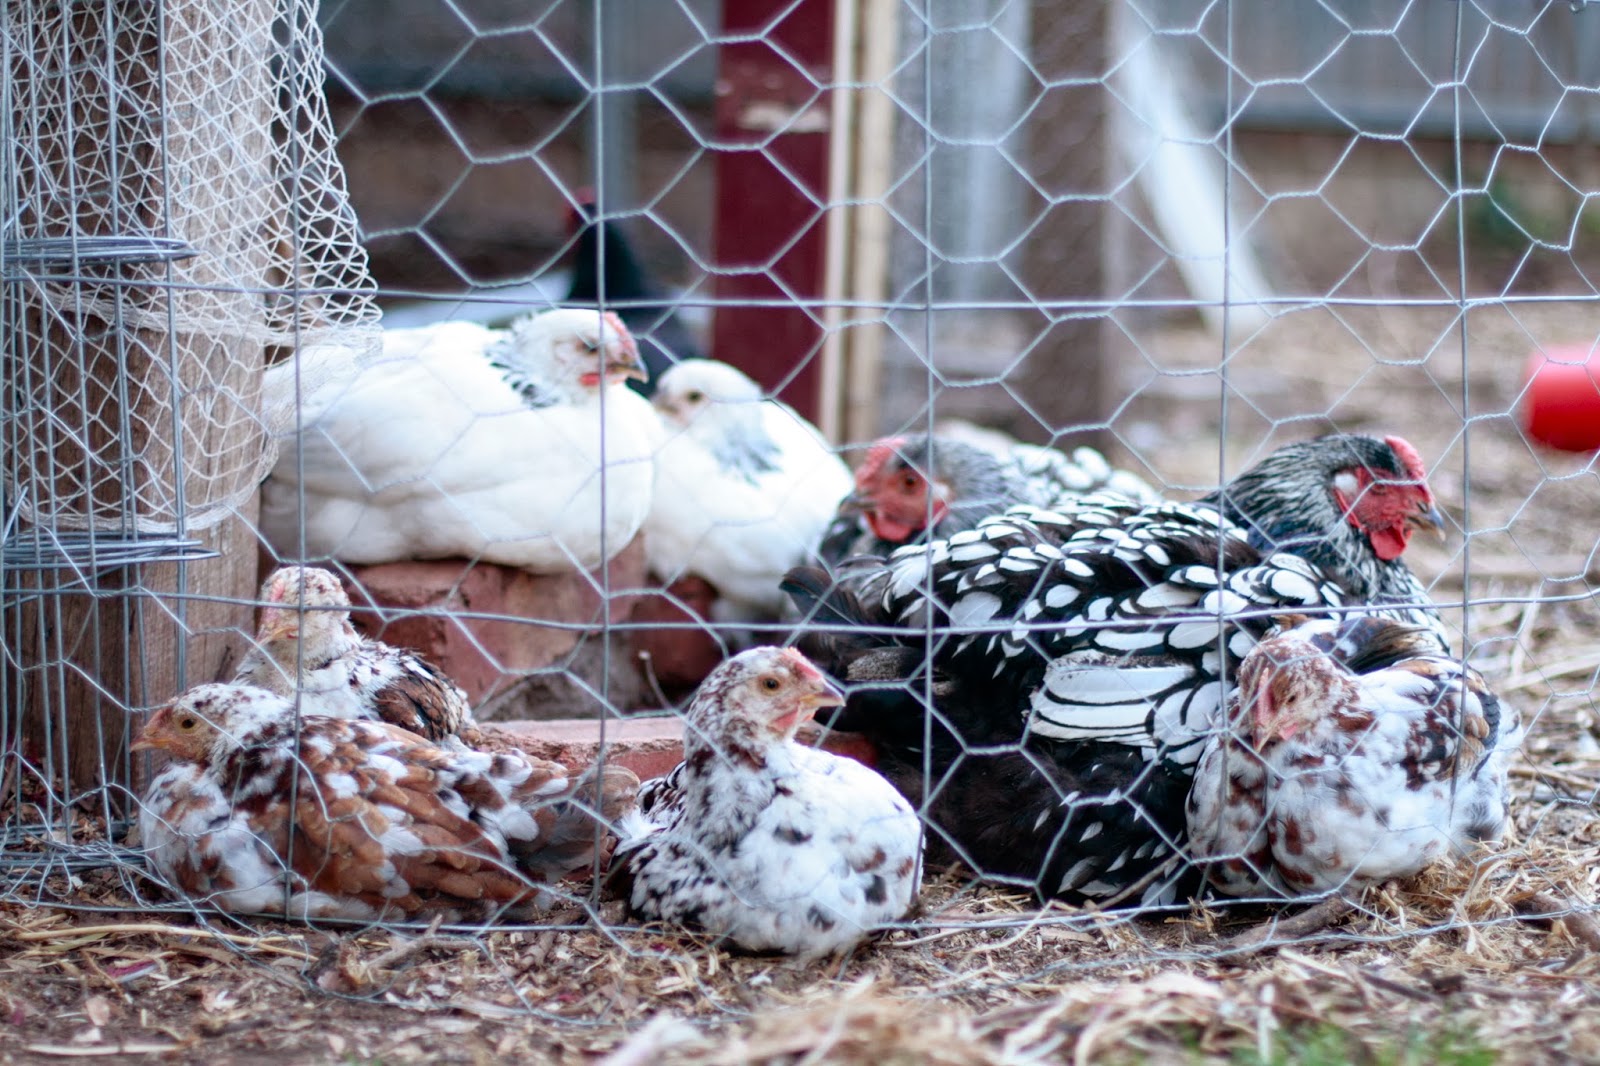
chickens are good for the soul

Ah, look at them. I could waste so much time just watching them. In fact I do. Except, I think it's not really time wasted. (Those are our six 'babies' there with the two mamas, at six-and-a-half weeks. How fast they grow!)

- Jane x

Friday, November 15, 2013

this moment - Clem's schoolbag contents

"A simple, special, extraordinary moment. A moment I want to pause, savor and remember." - joining with Soule Mama

- Jane x

Tuesday, November 5, 2013

PJs, shorts and another apron

Hmm, mysterious post title that, I wonder what I'm going to show you?

Clem has a habit of begging me to make him things out of such ridiculously adorable fabric that I am powerless to refuse. Check out those little lions. On Japanese cotton lawn. Oh, I suppose a second pair of summer PJ pants won't go astray.

And then, the Heather Ross Briar Rose frog pond shorts. It wasn't until I looked at this photo that I began to question the placement of that log on the front. It's just a log, and I will think no more of it.

Both PJs and shorts were made with my go-to pattern for Clem-pants, from Japanese Pochee magazine. Alas, he's now in the biggest size!

Styled with his pyjama top this morning, and a froggy hop.

 And he wanted me to take a photo of him wearing Dadda's childhood fire hat. It's made from that really sturdy seventies plastic and is in amazingly good shape.
Lastly, here's an apron I whipped up this morning as a gift for my boss at the job I recently left. Australian readers will probably be familiar with the 'map of Tassie' reference and corresponding placement on the apron. Let's just say it suited my boss's sense of humour very much. Inspired by the Sew Liberated Gathering Apron (in this post), I made it with a great big kangaroo-style pocket so it should actually be quite useful for her, as well as silly. Maybe good for gardening.
The apron is made from a souvenir linen tablecloth I've been hoarding for a few years (plus a bit of plain natural linen). I've been tempted to make myself a skirt from it but I'm not sure I could exactly, you know, wear it with pride. Apron - much better idea. And hard as it can be to make the initial cut into prized fabric like this, I'm always happier to see it put to good use rather than languishing in my cupboard. Yay for stash-busting gifts!

- Jane x

Saturday, November 2, 2013

Colette Violet blouse

I was inspired to try this pattern by a version of the Colette Violet blouse I'd seen on Pinterest. Of course in the end the only vague resemblance between the girl and shirt in the inspiration pic and myself and shirt are the fact mine is also a sort of plaid.

Shirt is unironed and I am totally unstyled but I have come to the conclusion that if I don't grab someone and get photos when a garment is hot off the sewing machine, it probably won't happen. Of course, husband or son will not tell me when a button is skewiff. But they don't notice things like that, bless them.

I wasn't too sure about the shirt - blouse - whatever - as it was coming together but in the end I think I quite like it. Needs to be washed and worn a bit to be 'broken in' but I think it will be a sort of good t-shirt substitute.

The fabric is a quilting cotton by Art Gallery Fabrics, and although I generally steer clear of quilting cottons for adult garments, the Art Gallery ones have a particularly soft and drapey feel. Even so, I think it's a little crisper than ideal for this pattern - but that's where I hope the wash'n'wear factor will come in.
Pretty happy with my plaid matching skillz. The buttons are some cute little things I found at the Salvos.

And the back. Super-creased, and probably could use some fitting adjustments. I cut a straight size 10 (Colette size 10 that is!) since the finished garment measurements seemed to work for my bust and hips. My shoulders are fairly narrow however so maybe I could have started with a size 8, done a FBA and graded out to a 10 in the hips. But sheesh, all the effort for a loose shirt? Nah...

Gosh but I love having my photo taken. This much.


Would you bother to make fitting adjustments to something like this? Or just let it 'wear in' to fit you better?

- Jane x
Related Posts Plugin for WordPress, Blogger...